能力标签
DeepCode Agent工作流
⚙️
Agent工作流

DeepCode Agent工作流

基于 Python · 无代码搭建完整 AI 自动化流程
英文名:DeepCode
⭐ 15.6k Stars 🍴 2.1k Forks 💻 Python 📄 MIT 🏷 AI 8.2分
8.2AI 综合评分
AI编码代码生成LLM智能体工作流自动化开源
✦ AI Skill Hub 推荐

DeepCode Agent工作流 是 AI Skill Hub 本期精选Agent工作流之一。在 GitHub 上收获超过 15.6k 颗 Star,综合评分 8.2 分,整体质量较高。我们强烈推荐将其纳入你的 AI 工具库,帮助提升工作效率。

📚 深度解析
DeepCode Agent工作流 是一套完整的 AI Agent 自动化工作流方案。随着 AI 能力的不断提升,基于 Agent 的自动化工作流正在成为提升个人和团队效率的核心方式。区别于传统的 RPA 自动化(模拟鼠标键盘操作),AI Agent 工作流通过理解任务意图、动态规划执行路径,能够处理更复杂的非结构化任务。

DeepCode Agent工作流 工作流的设计遵循"最小配置,最大复用"原则:核心逻辑已经封装好,用户只需配置自己的 API Key 和业务参数即可快速上手。工作流内置错误处理和重试机制,在网络波动或 API 限速等情况下仍能稳定运行,适合作为生产环境的自动化基础设施。

在实际部署时,建议先在测试环境中运行 3-5 次,验证各个环节的输出结果符合预期,再部署到生产环境。AI Skill Hub 评分 8.2 分,是同类 Agent 工作流中的精选推荐。
📋 工具概览

DeepCode Agent工作流 是一套完整的 AI Agent 自动化工作流方案。通过可视化的节点编排,将复杂的多步骤任务拆解为清晰的自动化流程,实现全程无人值守的智能处理。支持与数百种外部服务和 API 无缝集成,适合构建数据处理管线、业务自动化和 AI 辅助决策系统。

GitHub Stars
⭐ 15.6k
开发语言
Python
支持平台
Windows / macOS / Linux
维护状态
活跃维护,更新频繁
开源协议
MIT
AI 综合评分
8.2 分
工具类型
Agent工作流
Forks
2.1k
📖 中文文档
以下内容由 AI Skill Hub 根据项目信息自动整理,如需查看完整原始文档请访问底部「原始来源」。

DeepCode Agent工作流 是一套完整的 AI Agent 自动化工作流方案。通过可视化的节点编排,将复杂的多步骤任务拆解为清晰的自动化流程,实现全程无人值守的智能处理。支持与数百种外部服务和 API 无缝集成,适合构建数据处理管线、业务自动化和 AI 辅助决策系统。

📌 核心特色
  • 可视化 Agent 工作流编排,无需编写复杂代码
  • 支持多步骤自动化任务链,实现全流程无人值守
  • 与外部 API、数据库和第三方服务无缝集成
  • 内置错误处理与自动重试机制,保障稳定运行
  • 提供可复用的自动化模板,快速在同类场景部署
🎯 主要使用场景
  • 自动化日常重复性工作,将精力集中于创造性任务
  • 构建数据采集 → 处理 → 输出的完整自动化管线
  • 实现跨平台、跨系统的数据流转和业务协同
以下安装命令基于项目开发语言和类型自动生成,实际以官方 README 为准。
安装命令
# 方式一:pip 安装(推荐)
pip install deepcode

# 方式二:虚拟环境安装(推荐生产环境)
python -m venv .venv
source .venv/bin/activate  # Windows: .venv\Scripts\activate
pip install deepcode

# 方式三:从源码安装(获取最新功能)
git clone https://github.com/HKUDS/DeepCode
cd DeepCode
pip install -e .

# 验证安装
python -c "import deepcode; print('安装成功')"
📋 安装步骤说明
  1. 访问 GitHub 仓库获取工作流文件
  2. 在对应平台(Dify / Flowise / Make 等)中找到「导入工作流」功能
  3. 上传工作流文件
  4. 按照提示配置必要的环境变量和 API Key
  5. 运行测试确认流程正常后投入使用
以下用法示例由 AI Skill Hub 整理,涵盖最常见的使用场景。
常用命令 / 代码示例
# 命令行使用
deepcode --help

# 基本用法
deepcode input_file -o output_file

# Python 代码中调用
import deepcode

# 示例
result = deepcode.process("input")
print(result)
以下配置示例基于典型使用场景生成,具体参数请参照官方文档调整。
配置示例
# deepcode 配置文件示例(config.yml)
app:
  name: "deepcode"
  debug: false
  log_level: "INFO"

# 运行时指定配置文件
deepcode --config config.yml

# 或通过环境变量配置
export DEEPCODE_API_KEY="your-key"
export DEEPCODE_OUTPUT_DIR="./output"
📑 README 深度解析 真实文档 完整度 95/100 含工作流图 查看 GitHub 原文 →
以下内容由系统直接从 GitHub README 解析整理,保留代码块、表格与列表结构。

简介

DeepCode Logo
    ██████╗ ███████╗███████╗██████╗  ██████╗ ██████╗ ██████╗ ███████╗
    ██╔══██╗██╔════╝██╔════╝██╔══██╗██╔════╝██╔═══██╗██╔══██╗██╔════╝
    ██║  ██║█████╗  █████╗  ██████╔╝██║     ██║   ██║██║  ██║█████╗
    ██║  ██║██╔══╝  ██╔══╝  ██╔═══╝ ██║     ██║   ██║██║  ██║██╔══╝
    ██████╔╝███████╗███████╗██║     ╚██████╗╚██████╔╝██████╔╝███████╗
    ╚═════╝ ╚══════╝╚══════╝╚═╝      ╚═════╝ ╚═════╝ ╚═════╝ ╚══════╝
HKUDS%2FDeepCode | Trendshift

🎬 **Introduction Video**

🎯 Watch our complete introduction - See how DeepCode transforms research papers and natural language into production-ready code

<p> <a href="https://youtu.be/PRgmP8pOI08" target="_blank"> <img src="https://img.shields.io/badge/▶️_Watch_Video-FF0000?style=for-the-badge&logo=youtube&logoColor=white" alt="Watch Video"/> </a> </p>

</div>

---

"Where AI Agents Transform Ideas into Production-Ready Code"

</div>

---

📊 **System Overview**

DeepCode is an AI-powered development platform that automates code generation and implementation tasks. Our multi-agent system handles the complexity of translating requirements into functional, well-structured code, allowing you to focus on innovation rather than implementation details.

🎯 Technical Capabilities:

🧬 Research-to-Production Pipeline<br> Multi-modal document analysis engine that extracts algorithmic logic and mathematical models from academic papers. Generates optimized implementations with proper data structures while preserving computational complexity characteristics.

🪄 Natural Language Code Synthesis<br> Context-aware code generation using fine-tuned language models trained on curated code repositories. Maintains architectural consistency across modules while supporting multiple programming languages and frameworks.

Automated Prototyping Engine<br> Intelligent scaffolding system generating complete application structures including database schemas, API endpoints, and frontend components. Uses dependency analysis to ensure scalable architecture from initial generation.

💎 Quality Assurance Automation<br> Integrated static analysis with automated unit test generation and documentation synthesis. Employs AST analysis for code correctness and property-based testing for comprehensive coverage.

🔮 CodeRAG Integration System<br> Advanced retrieval-augmented generation combining semantic vector embeddings with graph-based dependency analysis. Automatically discovers optimal libraries and implementation patterns from large-scale code corpus.

---

🚀 Key Features

<br/>

🚀 Paper2Code

Algorithm Badge

Automated Implementation of Complex Algorithms

Effortlessly converts complex algorithms from research papers into high-quality, production-ready code, accelerating algorithm reproduction.

</td> <td width="30%" align="center" style="vertical-align: top; padding: 20px;">

🎨 Text2Web

Frontend Badge

Automated Front-End Web Development

Translates plain textual descriptions into fully functional, visually appealing front-end web code for rapid interface creation.

</td> <td width="30%" align="center" style="vertical-align: top; padding: 20px;">

⚙️ Text2Backend

Backend Badge

Automated Back-End Development

Generates efficient, scalable, and feature-rich back-end code from simple text inputs, streamlining server-side development.

</td> </tr> </table>

<br/>

---

🔄 **Process Intelligence Features**

🎯 Adaptive Flow

Dynamic agent selection based on input complexity

🧠 Smart Coordination

Intelligent task distribution and parallel processing

🔍 Context Awareness

Deep understanding through CodeRAG integration

⚡ Quality Assurance

Automated testing and validation throughout

</div>

---

📋 **Prerequisites**

Before installing DeepCode, ensure you have the following:

RequirementVersionPurpose
**Python**3.9+Core runtime
**Node.js**18+New UI frontend
**npm**8+Package management

```bash

Install frontend dependencies

npm install --prefix new_ui/frontend


##### 🐍 **Using Traditional pip**
bash git clone https://github.com/HKUDS/DeepCode.git cd DeepCode/

pip install -r requirements.txt

Install frontend dependencies

npm install --prefix new_ui/frontend


##### 🧪 **Editable install (lets `deepcode` always run THIS checkout)**

If you want the global `deepcode` command to launch the source tree you are
hacking on, install the project in editable mode after the steps above:
bash pip install -e . ```

This registers a deepcode-hku package (current version 1.2.0) and exposes the deepcode CLI entry point. Any local code change is picked up immediately on next launch — no reinstall needed.

If you maintain multiple DeepCode checkouts, only one of them can own the deepcode command at a time (the most recent pip install -e . wins). Reinstall in the checkout you currently want to be active.

</details>

📦 **Step 1: Installation**

Choose one of the following installation methods:

Direct Installation (Recommended)

```bash

🚀 Install DeepCode package directly

pip install deepcode-hku

1. Install MCP servers globally

npm i -g @modelcontextprotocol/server-filesystem

🚀 Quick Start

💡 Examples

🎬 **Live Demonstrations**

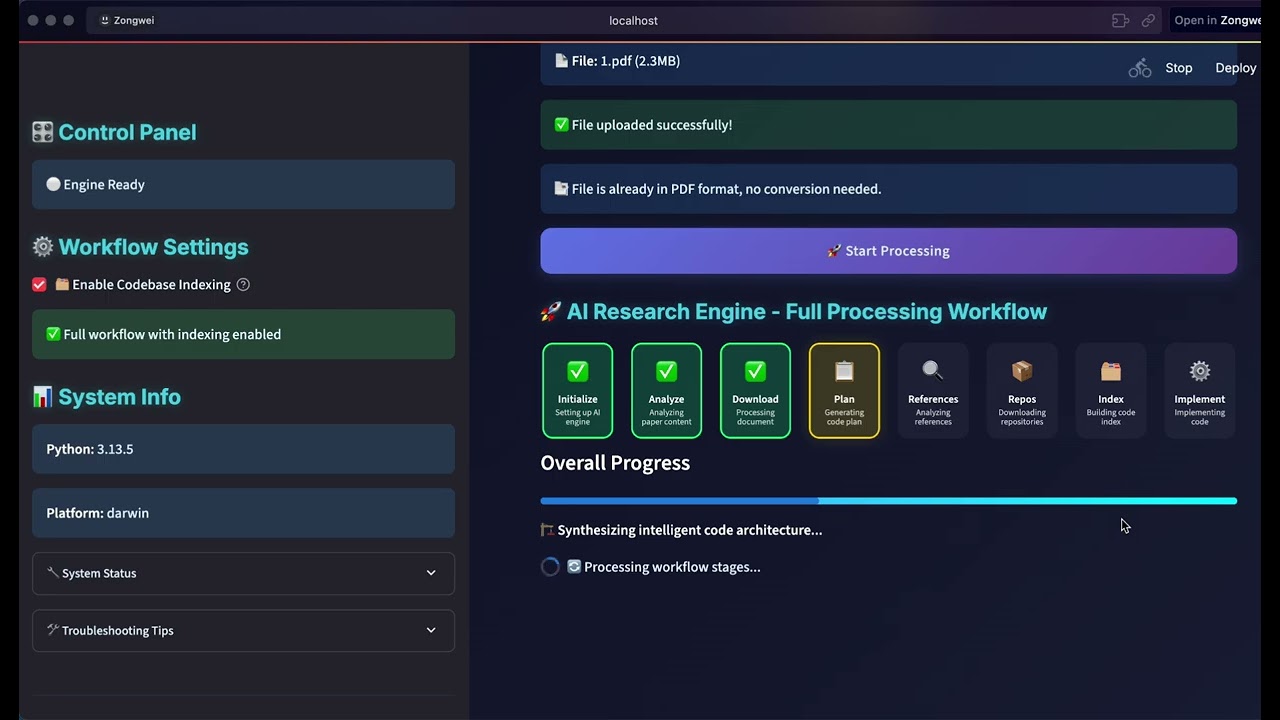
#### 📄 Paper2Code Demo Research to Implementation

Paper2Code Demo

▶️ Watch Demo

Transform academic papers into production-ready code automatically </div>

</td> <td width="33%" align="center">

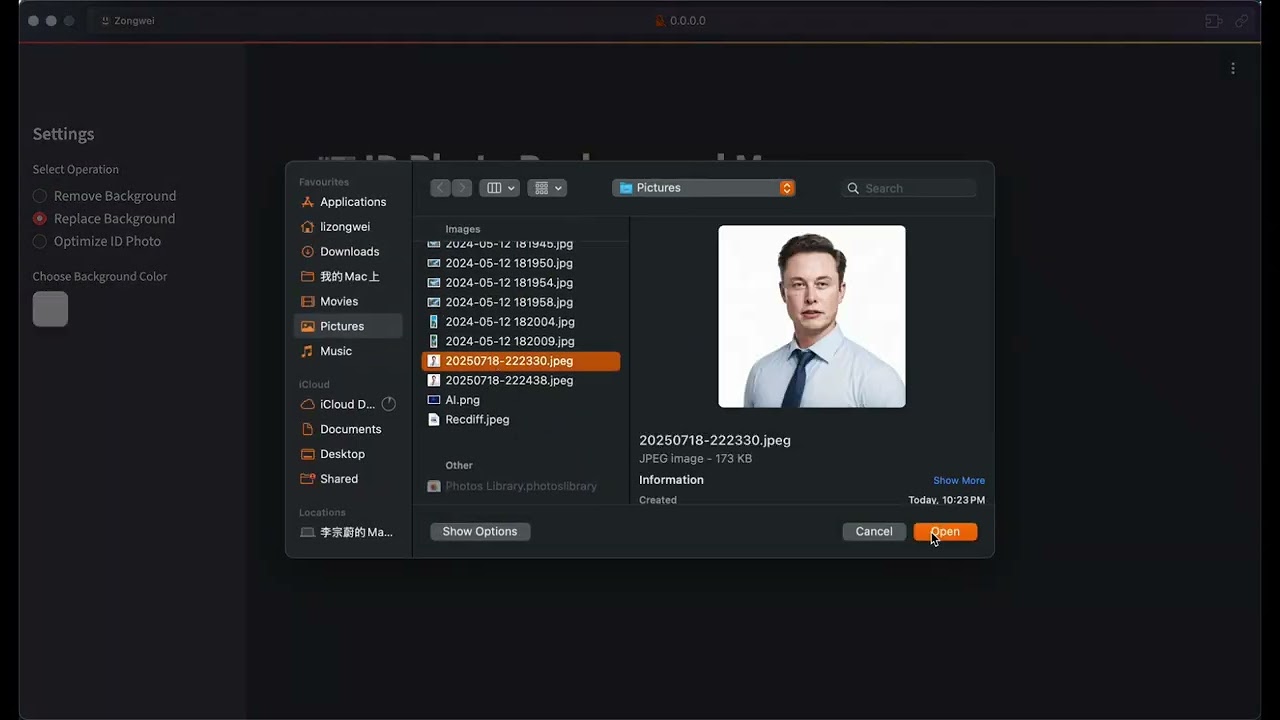
#### 🖼️ Image Processing Demo AI-Powered Image Tools

Image Processing Demo

▶️ Watch Demo

Intelligent image processing with background removal and enhancement </div>

</td> <td width="33%" align="center">

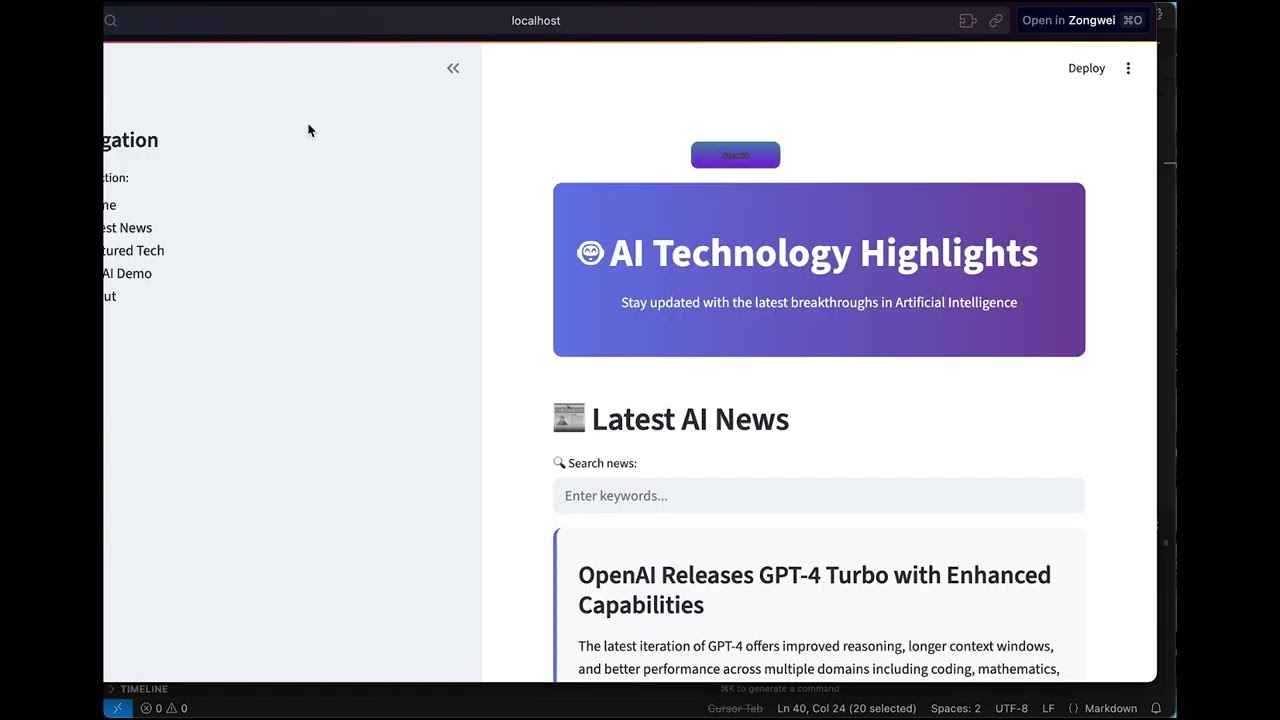
#### 🌐 Frontend Implementation Complete Web Application

Frontend Demo

▶️ Watch Demo

Full-stack web development from concept to deployment </div>

</td> </tr> </table>

🔑 Download the unified configuration template

curl -O https://raw.githubusercontent.com/HKUDS/DeepCode/main/deepcode_config.json.example cp deepcode_config.json.example deepcode_config.json


#### 🔧 **Development Installation (From Source)**

<details>
<summary><strong>📂 Click to expand development installation options</strong></summary>

##### 🔥 **Using UV (Recommended for Development)**
bash git clone https://github.com/HKUDS/DeepCode.git cd DeepCode/

curl -LsSf https://astral.sh/uv/install.sh | sh uv venv --python=3.13 source .venv/bin/activate # On Windows: .venv\Scripts\activate uv pip install -r requirements.txt

🔧 **Step 2: Configuration**

The following configuration applies to all installation methods (pip, UV, source, and Docker). Everything lives in one file: deepcode_config.json (single source of truth, nanobot-style).

🔑 API Keys (required)

Edit deepcode_config.json and fill in at least one provider key. Inline strings work, and ${ENV_VAR} references are resolved at load time.

{
  "providers": {
    "openai":    { "apiKey": "your_openai_api_key" },
    "anthropic": { "apiKey": "${ANTHROPIC_API_KEY}" },
    "gemini":    { "apiKey": "" }
  }
}

<details> <summary><strong>🔌 Using OpenAI-compatible providers (OpenRouter / Poe / DashScope / etc.)</strong></summary>

Any OpenAI-compatible endpoint is supported by overriding apiBase on the matching provider entry. Then set the model name on the agents block (using provider/model slugs):

{
  "agents": {
    "defaults": {
      "provider": "openrouter",
      "model": "z-ai/glm-5.1"
    },
    "planning":       { "provider": "openrouter", "model": "z-ai/glm-5.1" },
    "implementation": { "provider": "openrouter", "model": "z-ai/glm-5.1" }
  },
  "providers": {
    "openai":     { "apiKey": "your_openai_api_key" },
    "openrouter": { "apiKey": "your_openrouter_key", "apiBase": "https://openrouter.ai/api/v1" }
  }
}

OpenRouter model ids must use the exact id returned by OpenRouter, for example z-ai/glm-5.1, anthropic/claude-sonnet-4.5, or google/gemini-2.5-pro. In the new UI, open Settings → OpenRouter Models to search the live OpenRouter catalog and update the Default, Planning, and Implementation models without editing this file manually. Saving from the UI reloads the runtime for newly started workflows.

🔐 Never commit deepcode_config.json. It is already in .gitignore.

</details>

🤖 LLM Provider (optional)

The provider is inferred from the model slug (openai/..., anthropic/..., gemini/..., etc.). To force a specific backend, set agents.defaults.provider:

{
  "agents": {
    "defaults": { "provider": "openai" }
  }
}

📄 Document Segmentation (optional)

{
  "documentSegmentation": {
    "enabled": true,
    "sizeThresholdChars": 50000
  }
}

<details> <summary><strong>🪟 Windows Users: Additional MCP Server Configuration</strong></summary>

On Windows you may need to configure MCP servers manually in deepcode_config.json (tools.mcpServers):

```bash

Edit deepcode_config.json with your API keys

./deepcode_docker/run_docker.sh

Step 2 · Configure

cp nanobot_config.json.example nanobot_config.json

Edit nanobot_config.json — fill in the 3 required fields:

{
  "channels": {
    "feishu": {
      "enabled": true,
      "appId": "cli_xxx",              // ← Feishu App ID
      "appSecret": "xxx",              // ← Feishu App Secret
      "allowFrom": []                  // [] = allow all users
    }
  },
  "providers": {
    "openrouter": {
      "apiKey": "sk-or-v1-xxx"         // ← OpenRouter API Key
    }
  },
  "agents": {
    "defaults": {
      "model": "anthropic/claude-sonnet-4-20250514"
    }
  }
}
Model choice: Any model on openrouter.ai/models. Use anthropic/claude-sonnet-4-20250514 for English, minimax/minimax-m2.1 for Chinese.

---

🖥️ **Interface Showcase**

#### 🖥️ CLI Interface Terminal-Based Development

<img src="https://github.com/Zongwei9888/Experiment_Images/blob/8882a7313c504ca97ead6e7b36c51aa761b6a4f3/DeepCode_images/CLI.gif" alt="CLI Interface Demo" width="100%" style="border-radius: 10px; box-shadow: 0 8px 20px rgba(45,55,72,0.3); margin: 15px 0;"/>

🚀 Advanced Terminal Experience
⚡ Fast command-line workflow
🔧 Developer-friendly interface
📊 Real-time progress tracking

Professional terminal interface for advanced users and CI/CD integration </div>

</td> <td width="50%" align="center" style="vertical-align: top; padding: 20px;">

#### 🌐 Web Interface Visual Interactive Experience

<img src="https://github.com/Zongwei9888/Experiment_Images/raw/8882a7313c504ca97ead6e7b36c51aa761b6a4f3/DeepCode_images/UI.gif" alt="Web Interface Demo" width="100%" style="border-radius: 10px; box-shadow: 0 8px 20px rgba(14,165,233,0.3); margin: 15px 0;"/>

🎨 Modern Web Dashboard
🖱️ Intuitive drag-and-drop
📱 Responsive design
🎯 Visual progress tracking

Beautiful web interface with streamlined workflow for all skill levels </div>

</td> </tr> </table>

---

CLI mode

deepcode --cli

2. Find your global node_modules path

npm -g root

json { "tools": { "mcpServers": { "filesystem": { "type": "stdio", "command": "node", "args": ["C:/Program Files/nodejs/node_modules/@modelcontextprotocol/server-filesystem/dist/index.js", "."] } } } }

> Replace the path with the actual global `node_modules` path from step 2.

</details>

<details>
<summary><strong>🔍 Web Search Configuration</strong></summary>

DeepCode performs web content retrieval through the built-in `fetch` MCP server (no API key required) and reads local files via `filesystem`. The auxiliary search server defaults to `filesystem`:
json { "tools": { "defaultSearchServer": "filesystem" } } ```

💡 Tip: To plug in another search backend, add it under tools.mcpServers in deepcode_config.json and set tools.defaultSearchServer to its name.

</details>

🤖 nanobot Integration (Feishu Chatbot)

Chat with DeepCode from Feishu — powered by nanobot.
flowchart LR subgraph Clients["💬 Chat Platforms"] direction TB F["Feishu
WebSocket"] T["Telegram
Polling"] D["Discord
Gateway"] end subgraph Gateway["🐈 nanobot Gateway"] direction TB A["Agent Loop
LLM + Tool Calls"] end subgraph Engine["🧠 DeepCode Engine"] direction TB P2C["Paper → Code"] C2C["Chat → Code"] TRK["Task Tracking"] end F & T & D <-->|"messages"| A A -->|"HTTP API"| P2C & C2C & TRK A -.->|"LLM API"| LLM["☁️ OpenRouter"] style Clients fill:#1a1a2e,stroke:#00d9ff,color:#fff style Gateway fill:#1a1a2e,stroke:#4ecdc4,color:#fff style Engine fill:#1a1a2e,stroke:#ff6b6b,color:#fff style LLM fill:#1a1a2e,stroke:#9b59b6,color:#fff

</div>

DeepCode

nanobot

Both services run inside the same Docker Compose network. Prerequisites: Docker Desktop + OpenRouter API Key (get one) + Feishu App.

---

🔧 **Troubleshooting**

<details> <summary><strong>❓ Common Issues & Solutions</strong></summary>

ProblemCauseFix
Docker build fails with tsc: not foundCorrupted build cachedocker builder prune -f then rebuild with --no-cache
error during connect / cannot find the file / Docker is installed but not runningDocker Desktop not runningEither start Docker Desktop, **or** skip Docker entirely with deepcode --local
Frontend blank pageCorrupted node_modulescd new_ui/frontend && rm -rf node_modules && npm install
ERR_CONNECTION_REFUSEDWrong port / backend not runningDocker: http://localhost:8000. Local (--local): frontend http://localhost:5173, backend http://localhost:8000
npm installCould not read package.jsonWrong directoryUse npm install --prefix new_ui/frontend
Windows: MCP servers not workingNeed absolute pathsSee [Windows MCP Configuration](#-step-2-configuration) above
Windows: UnicodeEncodeError: 'gbk' codec can't encode... on launchDefault GBK console can't render emoji in startup bannerSet UTF-8 first: set PYTHONIOENCODING=utf-8 && set PYTHONUTF8=1 (cmd) or $env:PYTHONIOENCODING="utf-8"; $env:PYTHONUTF8="1" (PowerShell)
Windows: code-implementation stage hangs / produces a -p directoryLLM emitted mkdir -p ... and cmd.exe treated -p as a folder nameAlready fixed in tools/command_executor.py — common Unix commands (mkdir -p, touch, rm -rf, cp -r, mv) are now executed natively via pathlib/shutil, no shell needed
name 'LoopDetector' is not defined during code implementationMissing import in workflow modulesAlready fixed — LoopDetector and ProgressTracker are now imported from utils.loop_detector in both workflows/code_implementation_workflow.py and workflows/code_implementation_workflow_index.py

</details>

---

🇨🇳 中文文档镜像 AI 翻译 2026-05-25
英文原文章节由系统翻译为中文摘要,便于快速理解。完整原文见上方 "📑 README 深度解析"。
📌 简介

DeepCode 是一个强大的自动化开发工具,旨在将复杂的科研论文(Research Papers)直接转化为可运行的代码。通过集成先进的 AI 能力,它能够理解学术逻辑并实现高效的代码转换,帮助开发者从理论研究快速跨越到工程实现阶段。
⚡ 功能介绍

DeepCode 具备核心的 Paper2Code 能力,能够深度解析论文逻辑。同时,它内置了 Process Intelligence 功能,通过 Adaptive Flow 技术实现动�� Agent 选择,能够根据输入任务的复杂度自动调整处理流程,确保复杂任务的执行效率与准确性。

📋 环境依赖

在安装 DeepCode 之前,请确保您的系统已配置好必要的运行环境:需要 Python 3.9+ 作为核心运行时,Node.js 18+ 用于驱动全新的 UI 前端,并安装 npm 8+ 用于包管理。建议在安装前检查相关环境版本是否符合要求。

🛠 安装步骤(Docker/pip/源码)

DeepCode 提供多种灵活的安装方式:推荐使用 Direct Installation 通过 `pip install deepcode-hku` 直接安装;对于开发者,可以通过 Git 源码进行开发模式安装,并推荐使用 UV 工具进行管理;此外,您也可以通过 Docker 容器化环境快速部署,实现开箱即用的体验。

🚀 使用教程

项目提供了 Quick Start 快速入门指南,包含丰富的示例代码。用户可以通过 CLI 命令行模式或全新的 Web UI 界面进行交互。无论是进行简单的代码转换任务,还是复杂的流程自动化,DeepCode 都能提供直观的操作体验。

⚙️ 配置说明(含 MCP / env)

DeepCode 采用单文件配置管理模式,所有设置均统一存储在 `deepcode_config.json` 中,确保了配置的唯一性(Single Source of Truth)。用户需在此文件中配置必要的 API Keys,并支持通过 `${ENV_VAR}` 引用环境变量,同���支持 MCP 服务器的路径配置。

🔌 API 说明

DeepCode 提供了多样化的交互接口。除了支持开发者习惯的 Terminal-Based CLI 命令行界面外,还提供了直观的图形化界面。通过不同的模式,用户可以在终端或 Web 端灵活切换,满足从快速调试到深度开发的各种场景需求。

🔄 工作流/模块

DeepCode 构建了强大的模块化工作流,支持通过 MCP (Model Context Protocol) 扩展功能,例如集成 filesystem 服务器以实现文件系统操作。此外,通过 nanobot 集成,用户还可以将 DeepCode 接入 Feishu、Telegram 或 Discord 等聊天平台,实现跨平台的智能协作。

❓ FAQ 摘要

针对安装与运行过程中可能遇到的问题,我们整理了详细的 Troubleshooting 常见问题解答。例如,针对 Docker 构建时出现的 `tsc: not found` 错误或 Docker 连接失败等问题,提供了从清理缓存到重新构建的标准化解决方案。

🎯 aiskill88 AI 点评 A 级 2026-05-21

DeepCode展现了AI工程化落地的良好实践,15.6k星表明社区认可度高。多模态代码生成能力符合当下需求,代码质量有保证,值得AI开发者重点关注。

📚 实用指南(长尾问题)
适合谁
  • 需要让 Claude / Cursor 操作本地工具的 AI 工程师
  • 构建多智能体协作系统的 Agent 开发者
  • 构建企业知识库 / RAG 检索应用的团队
  • 跨境业务、多语言内容运营团队
最佳实践
  • 配置 MCP 服务器时建议使用 stdio 传输 + JSON-RPC,避免暴露公网
  • 生产部署优先使用 Docker Compose 隔离依赖,并挂载 volume 持久化数据
  • 分块大小建议 256-512 tokens,向量库优选 pgvector 或 Qdrant
  • Agent 任务先做 dry-run 验证工具调用链,再开启自主执行
常见错误
  • API key 直接提交到 git 仓库(请用 .env 并加入 .gitignore)
  • MCP 配置路径拼错或权限不足,重启 Claude Desktop 才生效
  • 容器内无法访问宿主机 localhost — 使用 host.docker.internal
  • embedding 模型与查询模型不一致导致检索失效
  • Python 依赖冲突:建议用 venv / uv 隔离环境
部署方案
  • Docker:DeepCode 提供官方镜像,docker compose up 一键启动
  • CLI:直接 npm install -g / pip install,命令行调用
  • 云端托管:可放在 Vercel / Railway / Fly.io 等 PaaS 平台
⚡ 核心功能
  • 可视化 Agent 工作流编排,无需编写复杂代码
  • 支持多步骤自动化任务链,实现全流程无人值守
  • 与外部 API、数据库和第三方服务无缝集成
  • 内置错误处理与自动重试机制,保障稳定运行
  • 提供可复用的自动化模板,快速在同类场景部署
👥 适合谁
  • 需要让 Claude / Cursor 操作本地工具的 AI 工程师
  • 构建多智能体协作系统的 Agent 开发者
  • 构建企业知识库 / RAG 检索应用的团队
  • 跨境业务、多语言内容运营团队
⭐ 最佳实践
  • 配置 MCP 服务器时建议使用 stdio 传输 + JSON-RPC,避免暴露公网
  • 生产部署优先使用 Docker Compose 隔离依赖,并挂载 volume 持久化数据
  • 分块大小建议 256-512 tokens,向量库优选 pgvector 或 Qdrant
  • Agent 任务先做 dry-run 验证工具调用链,再开启自主执行
⚠️ 常见错误
  • API key 直接提交到 git 仓库(请用 .env 并加入 .gitignore)
  • MCP 配置路径拼错或权限不足,重启 Claude Desktop 才生效
  • 容器内无法访问宿主机 localhost — 使用 host.docker.internal
  • embedding 模型与查询模型不一致导致检索失效
👥 适合人群
自动化工程师和运维人员项目经理和业务分析师希望减少重复性工作的专业人士数字化转型团队
🎯 使用场景
  • 自动化日常重复性工作,将精力集中于创造性任务
  • 构建数据采集 → 处理 → 输出的完整自动化管线
  • 实现跨平台、跨系统的数据流转和业务协同
⚖️ 优点与不足
✅ 优点
  • +GitHub 15.6k Star,社区高度认可
  • +MIT 协议,可免费商用
  • +大幅减少重复性人工操作
  • +可视化流程,清晰直观
  • +可扩展性强,支持复杂场景
⚠️ 不足
  • 初始配置和调试需投入一定时间
  • 强依赖外部服务的稳定性
  • 复杂场景需具备一定技术基础
⚠️ 使用须知

AI Skill Hub 为第三方内容聚合平台,本页面信息基于公开数据整理,不对工具功能和质量作任何法律背书。

建议在沙箱或测试环境中充分验证后,再部署至生产环境,并做好必要的安全评估。

📄 License 说明

✅ MIT 协议 — 最宽松的开源协议之一,可自由商用、修改、分发,仅需保留版权声明。

❓ 常见问题 FAQ
主要支持Python、JavaScript等主流语言,框架覆盖Flask、FastAPI、React等流行框架
💡 AI Skill Hub 点评

经综合评估,DeepCode Agent工作流 在Agent工作流赛道中表现稳健,质量优秀。如果你已有明确的使用需求,可以直接上手体验;如果还在评估阶段,建议对比同类工具后再做决策。

⬇️ 获取与下载
⬇ 下载源码 ZIP

✅ MIT 协议 · 可免费商用 · 直接从 aiskill88 服务器下载,无需跳转 GitHub

📚 深入学习 DeepCode Agent工作流
查看分步骤安装教程和完整使用指南,快速上手这款工具
🌐 原始信息
原始名称 DeepCode
原始描述 开源AI工作流:"DeepCode: Open Agentic Coding (Paper2Code & Text2Web & Text2Backend)"。⭐15.6k · Python
Topics AI编码代码生成LLM智能体工作流自动化开源
GitHub https://github.com/HKUDS/DeepCode
License MIT
语言 Python
🔗 原始来源
🐙 GitHub 仓库  https://github.com/HKUDS/DeepCode 🌐 官方网站  http://arxiv.org/abs/2512.07921

收录时间:2026-05-14 · 更新时间:2026-05-16 · License:MIT · AI Skill Hub 不对第三方内容的准确性作法律背书。